Gab with Gaby

An engineer's creative corner studio.

Tutorial

I Love You - Want2Scrap and Quick Quotes

How to, Paper crafting, Tutorial, Quick Quotes, Crafts, Coloring, Scrapbooking, Layout, StampsGabriela SimsComment

Hi everyone, Gabriela here today and I finally made a page I've been thinking about for a while. I thought it would be fun to make a page with a shaker window, so I tried it out. I used a chipboard cutout from Want2Scrap along with some of their bling and of course paper and ink from Quick Quotes. I scrapped a picture of my husband and I on vacation in New Orleans a few years ago, it's one of my favorite pictures of us and it seemed like a good fit for this page.

Me and my hubby on vacay! 

Me and my hubby on vacay! 

​Check out the video below!


Quick Quotes Products Used:

Urban Oasis - 101
Honeycomb - 105
Powder Puff Chalking Inks - Barn Board, Pixie Pink

Want2Scrap:
I Love You Chipboard
Self Adhesive Bling

Thanks for stopping over and happy crafting!  Please ask any questions below. 

Xyron and Quick Quotes, Make a Banner Page

Crafts, Diy, How to, Paper crafting, Layout, Quick Quotes, Scrapbooking, Tools, Tutorial, XyronGabriela SimsComment

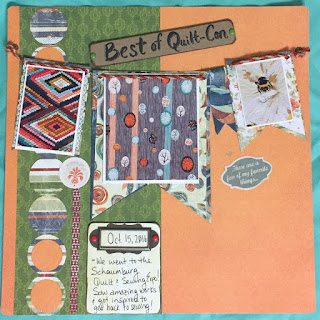
Hi everyone, Gabriela here today with a page using Club Q for this month with some help from my Xyron supplies. I made this page a banner page because of the adorable twine included in this month's Club Q. I also attended a quilt show this past weekend and decided to "hang" some of my favorites from the show on the banner. I started by choosing my 3 favorite pictures from the show and then built the page around that idea.


 Check out the video below to see how to put this page together.


I hope you enjoyed the video and you're inspired to make a banner page of your own. Thanks for stopping by, happy crafting.

 Quick Quotes Products Used:

Club Q

Powder Puff Chalking Inks - Mahogany

That amazing glitter gel pen is this amazing glitter gel pen from Sakura, it's a Gelly Roll and I love it!

Xyron and Quick Quotes, Destash Those Scraps

Cards, Xyron, How to, Tutorial, Paper crafting, Crafts, Diy, ToolsGabriela SimsComment

Hi everyone, Gabriela here today with a video that will help you destash your scraps. I have so many nice scraps from several Quick Quotes Collections that I hate to waste them, so here is a fun way to combine your scraps with a paper trimmer and die cutting to get a brand new look of patterned background paper.


I did a video for this technique because I thought that would be easier to follow than pictures. If you use this technique, you can make about a dozen cards in an hour. This technique would also work on a scrap page as a cool background accent, check out the video below.


I hope the video was easy to follow and that you have a great new way to use your scraps and make them brand new again. Thanks for stopping by.

Quick Quotes Products Used:

Whistlin Dixie

Earth Wind Fire

Urban Oasis 

49 Shades of Grey

Chiffon

I am so happy to share this, the Xyron Creative Station made this so easy to finish. Until next time, Happy Crafting and stay safe in these crafting streets.

-Gaby

Shaker Card with Quick Quotes and Stamps

How to, Cards, Crafts, Tutorial, Stamps, Diy, Quick QuotesGabriela SimsComment

Hi everyone, Gabriela here today with a Shaker Card using several different paper collections! This card will require your favorite paper, some acetate, stamps, and ink. Check out the video below to make this card.


Thanks for watching and happy crafting.

Quick Quotes Products Used:
Chiffon - 100, 103
Earth, Wind, Fire - 102
Whistlin' Dixie - 109
Powder Puff Chalking Inks - Mahogany and Pixie Pink

Lettering on a Wacom Pad using Adobe Illustrator

Tutorial, Diy, Tools, Drawing, Hand Lettering, Graphic design, How to, GraphicGabriela SimsComment

Hi there! I wanted to pop in and give you guys a quick tutorial of how to jazz up your hand lettering.  I have an Intuos Wacom Pad that I really love for digital drawing and I wanted to do some lettering on it as well.  I used Adobe Illustrator for this project; a simple graphic of my web address. You can play around with some of the settings, I settled on a Calligraphic Brush at .75 pt.

image.jpg

Then once I finalized and smoothed everything out, I sent the image to my toner printer and printed it on 2 sheets of cardstock, a purple sheet and a white sheet. 

image.jpg

Then to apply the foil I used my trusty Minc with fuschia and holographic foils.


Holographic on purple. 

Holographic on purple. 

Fuschia on white. 

Fuschia on white. 

These were so fun to make! I can see myself making lots of prints like this and experimenting with more brush types and techniques and doing more digital stamps.  See you soon, happy crafting!