Gab with Gaby

An engineer's creative corner studio.

ink

Shaker Card with Quick Quotes and Stamps

How to, Cards, Crafts, Tutorial, Stamps, Diy, Quick QuotesGabriela SimsComment

Hi everyone, Gabriela here today with a Shaker Card using several different paper collections! This card will require your favorite paper, some acetate, stamps, and ink. Check out the video below to make this card.


Thanks for watching and happy crafting.

Quick Quotes Products Used:
Chiffon - 100, 103
Earth, Wind, Fire - 102
Whistlin' Dixie - 109
Powder Puff Chalking Inks - Mahogany and Pixie Pink

Misting and Inking with Quick Quotes

Crafts, Diy, How to, Layout, Paper crafting, Quick Quotes, Scrapbooking, TutorialGabriela SimsComment

Hi everyone, Gabriela here and today I'm doing a scrapbook layout using some paper weaving, misting, and inking.  I am scrapping a photo from Wizard World that includes a very brightly colored monster, so I wasn't afraid to mix patterns and colors here.  I did my misting first and then used a heat tool to help it dry, it will curl a little, but once you have this in a page protector for a few days it will flatten itself.  I'm using cut strips of paper and chalking ink that I thought went with the photo, you could use different collections and colors to get a completely different look, check out the video below.


I think you could change just a few elements on the page and use this layout for lots of occasions/themes.  I hope it inspired you to "lift" this page and gave you another idea for how to use your ink pads, thanks for stopping by.

Quick Quotes Products Used:

49 Shades of Grey - 101, 105
Whistlin Dixie - 100, 105
Powder Puff Chalking Inks - Lemon Sorbet, Pixie Pink

Until next time, happy crafting!

QuickQuotes - March Club Q

Color, Crafts, Diy, How to, Layout, Quick Quotes, Scrapbooking, Supplies, TutorialGabriela SimsComment

Hello everyone, Gabriela here showcasing this month's Club Q and before I get into my project, let me talk about the greatness of this kit. I received a nice variety of papers and embellishments as well as a package of Petaloo flowers. There was even a set of full instructions for making an Altered project, just a really robust kit with some nice ideas and it was nice to see the paper collections paired in ways I might not have thought of on my own. One of the things I couldn't wait to use was the blinged butterflies, they were wonderful on their own, but I decided to add a little chalking ink to them to make them more visible.

I used chalking inks to color the butterflies and then added glossy accents to "seal" the color in, this requires allowing it to dry overnight, but I think the results were worth the wait. 
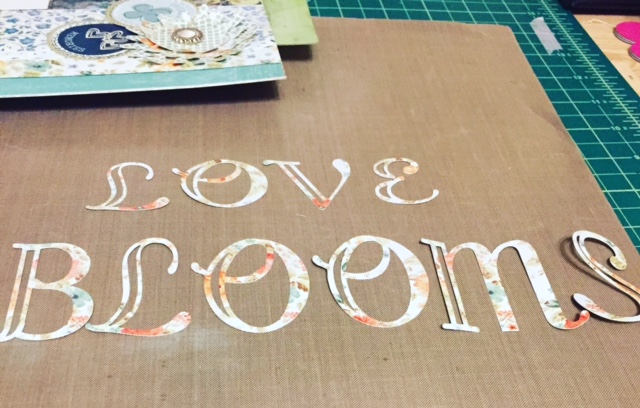
Next I decided to go with a theme of "Love Blooms" for a double page layout.
I proceeded to build my page around my butterflies and flowers and even created a few additional paper flowers to help fill out the pages. I also did some edge punches with the paper to create borders for both sides of the layout.
The finished layout will have pictures from a Botanic Garden tour on the white spaces but you could really put any photos you like in the layout. I hope you have as much fun with your Club Q as I did and happy crafting!


Quick Quotes Products Used
March Club Q
Powder Puff Chalking Inks - Pixie Pink, Seabrook, Aqua, Lemon Sorbet, and Mahogany
Anchors Away - 106

Be a Peacock!

Color, Tutorial, Drawing, Graphic, Crafts, Supplies, How to, Diy, Cards, Coloring, Paper crafting, Hand LetteringGabriela SimsComment

So I have been participating in the #sisterswithheartinart challenge on IG, and every week there's a new prompt, this week was  "Peacock", so I took it all the way. I started by drawing on black card stock.

I used Prismacolor pencils. 

image.jpg

Then I colored the body in and cut out the outline. 


Just the body, but I left the bottom connected. 

Just the body, but I left the bottom connected. 

Then I got my bag of feathers. 


Might be messy... 

Might be messy... 

Then arranged them behind the body. 


First feather. 

First feather. 

Then I attached it all to a distress inked background. I also hand lettered the quote and mounted it on glitter paper. 


So many feathers! 

So many feathers! 


This did take a while, but It was really fun, next post will be my first post for Quick Quotes! Happy crafting!

Under the Sea Shaker Card

Crafts, How to, Graphic, Paper crafting, Color, Supplies, Tools, Tutorial, Diy, Drawing, Cards, Stamps, ColoringGabriela Sims2 Comments

This card was done using the "No lines" coloring technique. No video today, but here is a step out. 


Stamp your image in a soft, neutral color. 

Stamp your image in a soft, neutral color. 

This is one of my favorite stamps, a mermaid from Stampendous. 


Color your image, I used Copic Ciaos

Color your image, I used Copic Ciaos

I used a few Spectrum Noirs too.  

Cut out your image. 

Cut out your image. 

I used Distress ink in varying colors to make the "water", I used a torn paper masking technique. 

I used Distress ink in varying colors to make the "water", I used a torn paper masking technique. 

Rain stone application. 

Rain stone application. 

Shaker sequin selection! Those flowers are from a set I got at Target! 

Shaker sequin selection! Those flowers are from a set I got at Target! 

I made a foam tape barrier. 

I made a foam tape barrier. 

Adhered the front, and it's done! 

Adhered the front, and it's done! 

Under the sea! 

Under the sea! 


That's all, hope you're inspired to make something fun! Happy crafting!