Gab with Gaby

An engineer's creative corner studio.

crafts

Give Thanks for the Little Things

Quick Quotes, How to, Paper crafting, Crafts, Diy, Want2Scrap, Xyron, Decor, TutorialGabriela SimsComment

Hi everyone, Gabriela here as part of the Want2Scrap blog hop! I did a project that you can use for you Thanksgiving table or have in your house all year long. This took me about an hour and a half to finish and it was very simple to make. I used a mirror for this, but you could use an old frame or a shadow box.


I started with the 12" round mirror, a chipboard die cut from Want2Scrap, Honeycomb 102, and Mahogany ink.


I inked "The little things" with Mahogany ink and then cut out "Give Thanks for" on my Cricut from the Honeycomb paper.


While I let the chipboard dry, I put Want2Scrap bling around the edge of the mirror for a decorative effect.  This part took the longest, but I put on some music and I was done in about 30 minutes.


To make attaching the letters easy, I used my Xyron to put adhesive on the back of the paper and the chipboard.


Finally, I attached the words using a ruler and my cutting mat to line everything up; here's the finished project.


The first picture was taken with nothing in the reflection and the second was taken to show how the words look with a reflection of something.  I am planning on getting a plate stand for this so I can display it for Thanksgiving! If you use a frame or shadow box, you can hang it on the wall as decor for the whole year.  I hope you liked this project and you give it a try, thanks for stopping by.

Quick Quotes Products Used:

Honeycomb 102
Powder Puff Chalking Ink - Mahogany

Want2Scrap

Xyron

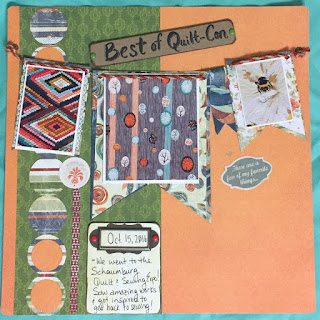
Xyron and Quick Quotes, Make a Banner Page

Crafts, Diy, How to, Paper crafting, Layout, Quick Quotes, Scrapbooking, Tools, Tutorial, XyronGabriela SimsComment

Hi everyone, Gabriela here today with a page using Club Q for this month with some help from my Xyron supplies. I made this page a banner page because of the adorable twine included in this month's Club Q. I also attended a quilt show this past weekend and decided to "hang" some of my favorites from the show on the banner. I started by choosing my 3 favorite pictures from the show and then built the page around that idea.


 Check out the video below to see how to put this page together.


I hope you enjoyed the video and you're inspired to make a banner page of your own. Thanks for stopping by, happy crafting.

 Quick Quotes Products Used:

Club Q

Powder Puff Chalking Inks - Mahogany

That amazing glitter gel pen is this amazing glitter gel pen from Sakura, it's a Gelly Roll and I love it!

Make a Flower Shadowbox

Diy, Crafts, Scrapbooking, How to, Florigami, Quick Quotes, TutorialGabriela SimsComment

Hi everyone, Gabriela here today with a tutorial on how to make a piece of shadow box art.  I used the Whistlin' Dixie collection again because I'm in love with it right now.  You will need a shadow box and you will need to cut out rosettes and flowers from the paper you choose.  I used my Cricut for this because it saved time.  I cut the stems and the leaves by hand.


Check out the video below.


Quick Quotes Products Used:
Whistlin' Dixie - 109,108, 107, 101, and 100
Powderpuff Chalking Ink - BarnBoard

Thanks for stopping by!

Happy crafting!

My first post for Quick Quotes, On the Fence

Cards, Color, Diy, How to, Paper crafting, Quick Quotes, Supplies, TutorialGabriela SimsComment

Hello everyone Gabriela here with my first project for Quick Quotes. First let me say that I am delighted to be joining this talented group and I am really looking forward to the year!

This is a sweet card that could be a Valentine's Day card or just a card to say I love you.


I started with Farmhouse 104


I cut a piece to A2 size, 4.25" x 5.5" and then added the scallops to make a fence by tracing the bottom of a small container.


Then I used Powder Puff Inks on my craft mat with a water brush to add some aging to the fence. Shown here are Mahogany, Milk Chocolate, and Navy.

I pressed the ink pad onto my craft mat and then used a water brush to pick up color.


Then I cut out 3 small banners from a Words & Phrases sheet and inked the edges.


Then I punched holes in the tops and threaded them onto a piece of  ribbon. Then I applied double sided tape and cut a semi-circle out of one of the fence panels to make it look more real.


I decided to ink a background that would show behind the fence just a little. I used heavy weight white card stock for my base.  I wanted it to look like the sky, so I used Navy, Seabrook, and Aqua inks.


After seeing it, I decided it needed some grass, so I took a scrap piece of white card stock and inked it up using Green Leaf.


I drew some grass blades and then fussy cut the whole thing.


I attached the grass and that completed the card.


I hope this inspires you to have some fun with your supplies, happy crafting!

Quick Quotes Products Used:

Farmhouse 104
Cardstock Words & Phrases

Powder Puff Chalking Inks:
Aqua
Navy
Mahogany
Milk Chocolate
Seabrook
Green Leaf

Gab about your Stash #1

Tools, Color, Cards, Supplies, Diy, Graphic, Crafts, Watercolor, Paper crafting, StampsGabriela SimsComment

So I LOVE crafting supplies as evidenced in the craft storage post, but I'm trying to get better about using what I buy, so starting in the next few weeks, I am going to make a habit of using supplies I already have and scraps of projects from the week. I will make posts here and on my YouTube channel so that people can keep up. I will do a 10 minute Monday, a technique card, a product review, and then a Saturday Scrapternoon where I use up that week's scraps! In really excited about that and I hope it will keep me on task to create more and work through a massive stash of supplies and tools.  I have lots of tools I have never reviewed, but that I use often, so it'll be nice to share long term pros and cons.  In the meantime, here are this week's cards.


Iris folding? I can dig it! 

Iris folding? I can dig it! 

I started using supplies I have and remembered I have like 30 Gelatos and two kits!  

Gelatos and modeling paste. 

Gelatos and modeling paste. 

More with the amazing watercolors. 

This was for a challenge and the prompt was "Bright". 

This was for a challenge and the prompt was "Bright". 

Because I still love yarn! 

The Avery Elle "Made With Love" stamp set and some Copics...and a yarn chain. 

The Avery Elle "Made With Love" stamp set and some Copics...and a yarn chain. 

My first 10 minute card...that took 12 minutes! Lol, I'll be posting this video soon! 

I used nothing but supplies I already had. 

I used nothing but supplies I already had. 

Distress ink, Minc foil, and some time. 

Distress ink, Minc foil, and some time. 

That's all for today, check back in the next week or so for the new lineup of paper crafting vids and posts! Happy crafting!